

When we bought the house in December, there were moments of pure regret. The previous owners didn't exactly tell us how terrible the boxelders bugs and mice were.. after about a week, there was no denying it was a problem. Thankfully my Dad is a selfless man and used some of his vacation time to remove all of the insulation in the basement and covered every. single. mouse hole he found. After some random warm days among the winter storms we found where the box elder bugs congregated and were able to so far mitigate that.
Feeling completely grossed out by the condition of the house and not feeling at home at all, we craved to love it like we did our first home. As we sat night after night staring at the kitchen, dreaming up how we could make it our own and lamenting about the island which originally had a snack bar and a stovetop insert in the middle.

It became the third nuisance of the house, you can't even tell that the stove top is in the island. In our last home the island was the most used space of our kitchen, we did crafts, canned jelly, unloaded groceries, housed thanksgiving meals and birthday cakes. The island had to be changed and everything dominoed from there.

We couldn't help ourselves. Once we cut into the island we knew we needed to decide what was next, do we move the stove top? If we move the stove top, everything else has to be moved as well. Do we just replace the island top or do we replace all of the countertops? As you can probably already tell.. we replaced the countertops. Instead of spending $3,000 or so to get stone counters we decided to make our own.
I LOVE LOVE LOVE marble counters and I had to find a way to make that happen.
After a couple of months of research and drooling over some resin/epoxy videos I've seen, we pulled the trigger and purchased a 2 gallon resin kit from Stone Coat Countertops.
We made the base of our countertops from MDF board. You can pour the epoxy over existing countertops but we needed a whole new island top and didn't like the countertop laminate backsplash.
So for the sake of this post, I'm only going to show you our process for the epoxy. I'll write a different post for the MDF fabrication.

What you will need (whether covering old counters or making new):
- From Stone Coat Countertops
- We ordered TWO 2 gallon kits, we have about 60 sqft of countertop. Measure the sqft of your countertops and buy the appropriate amount of resin. Stone Coat's website tells you which kit to buy per the amount you need. I linked it above ^
- Notch Trowel - Theirs is the best for this type of project
- Base color tint- We used white and only needed 1
- A primer, since we were using MDF board we were able to use regular wall paint. We used Natural Gray (our favorite) from Home Depot
- If you are covering something else I would look into Stone Coats bonding primer
- Mica powders- You get the best bang for your buck on amazon
- we used: Silver Pearl and Battleship Gray
- Isopropyl alcohol
- Spray bottles
- Mixing containers- a few sizes- When in doubt get more, you can always return them
- Paint mixer- this makes it easier to mix large sets of resin
- Drill
- Paint stir sticks
- 3-4 Angle brushes
- Plastic drop clothes
- Painters tape
- Blow torch
Your prep is a big deal but if you're pouring over existing countertops it's an even bigger deal. Protect your cabinets, sink and appliances (move fridge or stove out of the way if you can ) by covering them in plastic drop clothes, use painters tape to secure the plastic. The resin will drip over the sides, be careful not to step in the drips on the ground or you'll be a walking sticky mess.
After your prep, prime your counters (you may need to lightly sand your counters depending on what they're made of and use a special bonding primer). We were able to just prime ours with wall paint because they were plain MDF board. Let them dry.


Before mixing up any resin assemble the spray bottles and mix in some mica powder with the isopropyl alcohol, you'll use this to spray on top of the resin to create a really cool cell like affect. More on that later.
Now is the time to mix up your first batch of resin in the 10qt container. 1:1 ratio. We used one of our 2 gallon kits, but in the end didn't need to mix ALL of it. You will notice it will be foggy, mix it until it is all combined and there aren't any more striations/strings. After our initial mixing we had about an hour of working time before the resin became too difficult to work with.

Put some of the clear resin into your smaller 1 qt containers then mix some of your mica powder into these. Get creative, make them as dark or as transparent as you'd like!
Back to your 10 qt container add your base color into the rest of the resin. We used white from Stone Coat Countertops.
Pour the base color/resin in the center of counter top throughout the kitchen and use your trowel to mix it on the surface. You will spread the resin on top of the surface WITHOUT letting it drip over the edge. You will trowel the product back and forth like wiping up water with a towel and will eventually push product over the edge. It you have a TON of product left over after lightly troweling, I would push it into a bucket just in case you need extra elsewhere. It'd be a lot harder to pick it up off the floor.

Using one of your angle brushes (make sure you pull out any loose hairs from the brush) saturate the brush with resin and in long strokes brush the edges with resin. It's important to have the edges brushed with product before letting the resin run over the edge. If you don't remember this tidbit, your edges wont be as smooth as they could be and wont flow evenly.
After you have successfully spread your base color, you will use your colors you mixed earlier for us it was the silver pearl and battleship grey. We wanted it to look like marble so we poured the battleship grey first and started from on edge to the other in varying angles throughout the countertop. We then added the silver pearl on top.
Starting off the side with your color gives you the look of real stone as if the color is all the way through.

To get the color to meld nicely and naturally we used our torch to make them move. We added more striations in different sizes throughout the whole piece. There was one part that we HATED while doing it and then we just torched it a bunch to get it to move a lot and it's now one of my favorite spots.
My only caution with the torch is that you can burn the resin and it will discolor, but for us it was a happy accident because we like the color haha.

Torching is VITAL to getting all bubbles out of your project. You should pop bubbles periodically throughout your working time.

To add some other colors or affects you can play around with spray paint, we did on our test piece here:


We didn't end up using spray paint in our final project, simply because we forgot about it.
Once we finally liked where all of our lines were we used our spray bottles to create a cell/circular effect to replicated real stone. If you end up spraying too much, you can easily use your finger to break them apart. or use your torch to make the product move. Before using the torch, let the alcohol dissipate or you may light it on fire ;)

After playing around with the spray bottles adding shimmer and cells we torched the bubbles out.
For the next couple of hours use a paint stir stick to scrap the drips off from the bottom of the countertop. they can be sanded off later but it's more intensive than just scraping them off.
The resin will need at least 24 hours to cure. To test it you can touch a discreet spot that has resin on it, if its tacky, it's not ready.
The next and last step is to do your flood coat (we used the second 2 gallon kit we had) which is just clear resin over the top of your colored resin. You will mix, trowel and do the edges the exact way you did the first time, just without any colors. Over time as the countertop wears you can sand and buff out any scratches. By doing a flood coat you're protecting the color and art of your piece.

Allow the flood coat to cure for at LEAST 48 hours. We left ours in the basement for almost a week before bringing them up.


We also made it one GIANT piece and needed 4 people to bring it up and around our house..in the snow haha. Thanks Mom and Dad, couldn't have done it without you.
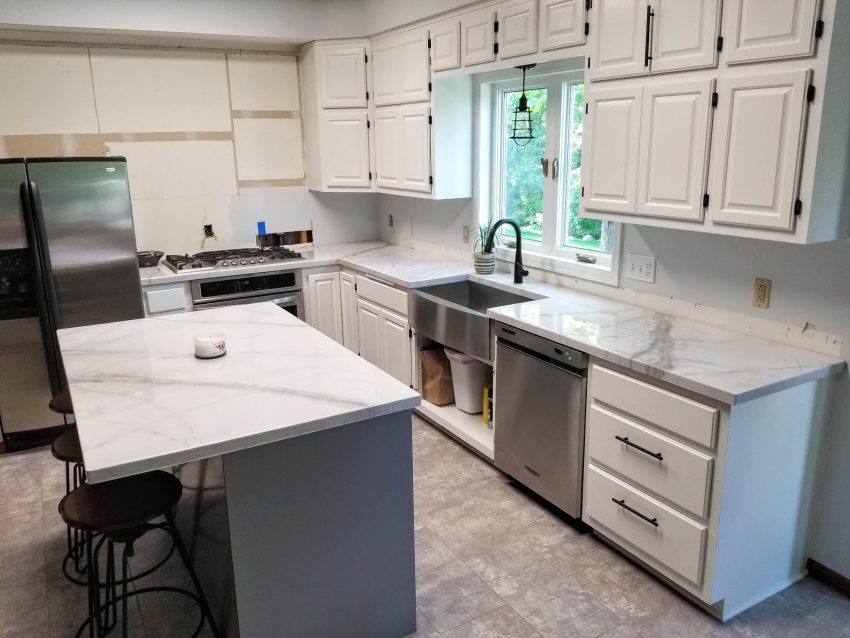
No seams! The L shape was pieced together and resined as a whole.


We are really rather happy with how these turned out. Theres so much more to their story but i'll share those pieces with you soon enough!
Be creative and watch lots of youtube videos... then watch more.
p.s. blog of bloopers and mishaps to come.. cause we had plenty!
Cost break down:
- Epoxy resin (2, 2 gallon kits): $380
- Epoxy resin: (1 half gallon): $95
- Micca powder (2): $30
- Base color tint (1): $20
- Misc items: Spray bottles/containers/drop clothes/brushes/wood glue etc.: About $100
- MDF board: $100
TOTAL project cost: $725


